Showing posts with label Blogging. Show all posts

Sunday, 5 April 2015

How To Download Full Backup Of Blogger Blog Posts

How_to_download_full_backup_of_blogger_blog_posts
Download Full Backup Of Blogger Blog Posts
Namaste :) In this post I'll explain How you can download full backup of your blogger blog. Nowadays every newbie have their own blog. The main purpose to create a blog on blogger.com is to make money with Google AdSense. Because Google AdSense is best choice to show genuine ads on your blogger and make money with it. Read this post 'Approve AdSense In A Minute On Your Blog' to successfully get approved by Google AdSense in very first attempt. Come on the topic, Backup is very important because sometimes your blogger blog gets deleted.  May be it's because your blog is avoiding TOS of Blogger or may be you deleted it by mistake. So in case you loose your all posts of blogger blog. But if you have backup of your blogger blog then you need not to worry you can easily get your all valuable posts. Just upload that backup and you are done! 

So lets start, follow the below mentioned steps accurately to download full backup of your blogger blog - 


How to download full backup of blogger blog ? 


Step 1. First of all login to your blogger dashboard and choose the blog which you want to take backup of. 

Step 2. Then go to > Settings > Other  Here is an option 'Blog Tools' 

Step 3. Click on 'Export blog' and then a pop-up will open. 
backup_all_posts_of_blogger_blog_in_a_minute
Click on Export blog


Step 4. Now click on 'Download Blog' and backup of your blog will start downloading. 

backup_blogger_blog_full_tutorial_easy_way
Download Blog
  
That's it! Now you have full backup of your blogger blog to use in bad situation. To use that backup you have to upload that backup file to the new blog. To do so follow the below instructions. 

How to upload full backup of your blogger blog to another blog ? 


Step 1. Sign in to your blogger blog and open dashboard of your new blog. 

Step 2. Now go to Settings > Other > Blog Tools 

Step 3. Now here you will see three options Import blog - Export blog - Delete blog. 

Step 4. You have to choose 'Import blog' option and a pop-up box will open. 
how_upload_backup_of_blogger_blgo_to_another_blog
Import Blog


Step 5. Now choose your backup file by clicking on 'Browse' button. 

Step 6. Then click on 'Import Blog' button to start uploading your blog backup.
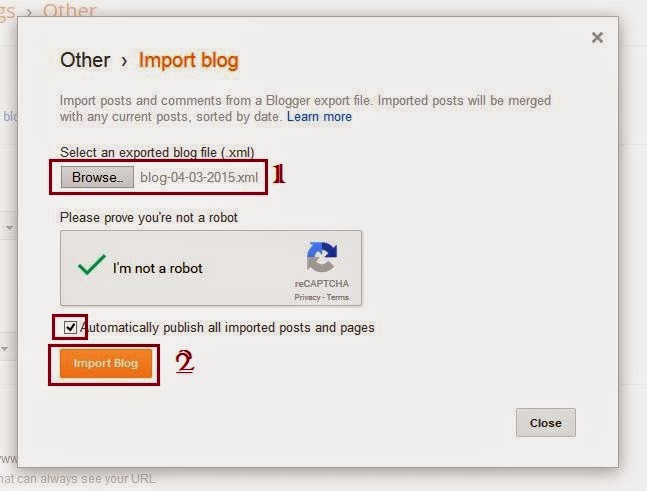
copy_all_posts_of_old_blogger_blog_to_another_blog
Upload Blog


You have done! Now wait a few minutes till backup file successfully uploaded. After that your all posts of old blog will be published automatically on your new blogger blog. :) 

 So enjoy your new blog with all your old posts and pages. :) 

How to backup all posts and pages of Blogger Blog Full Tutorial 


If you liked this post then please share it with your friends on Facebook and other social sites because 'Sharing is Caring' :) 

Keep visiting for more such tutorials and tricks. ;) 

Have any query or questions regarding this post ? Don't hesitate to ask in comments below. 

Share+Like+Comment - Thank You! :)

Monday, 9 March 2015

How To Earn Extra Money With Your Websites Or Blog [Guide] [UPDATED]

how_to_earn_extra_money_from_your_blog_or_website_full_guide_latest
Earn Extra Money

Extra Earning With Your Websites


Guys if you are running your blog and website by uploading files and want to earn some extra money, now today I will share with you some of the real and genuine sites which are giving the user's money for more than a year and are trusted one. You can search on every format regarding these sites, you will come to at one point as these are real and trusted sites for earning  by uploading sites.
Also there are lot of sites which gives the money but these sites are one of the best while in case of withdraw your money and in other services. The sites with their maximum uploading files rates are listed below with brief explanation and signup methods. If you are running your sites with only 1000 viewers everyday, you can easily make more than 10$ by these sites, and there are no limits for earning


UsersCloud
UserCloud is the best site which I ever saw and gives maximum revenue, as using it you can earn even 10$ in a day and good thing is that it's minimum withdraw is 5$, also other features of that site are :
  • Unlimited Storage
  • Unlimited Downloads
  • Unlimited Upload
  • Unlimited file size
  • Files Never Deleted
  • Remote URL upload
  • Download-Accelerators support
  • Downloads resume
  • Unlimited Download Speed
  • No downloads delay
  • No downloads captcha
  • FTP
  • No Advertisements
Accepted payout method is Paypal yet, but I have talked to admin of that site, and more payout method will be introduced in next years. So hurry up guys and register on this amazing site. Link has been provided above for the site info and registration.
Rapidgator
Rapidgator is one of the best and trust worthy site which gives upto 40$ by uploading files on their site, also it has more than 2000 GB Free storage for your files. For earning from rapidgator, you just need to signup on this site and just upload your files and start your earnings with them today. The signup link is Here !
Withdraw notes : First you cannot get money at once, for this you will have to upload the files and then will get different rates on the basis of sizes of files, but you can earn maximum from them after signup and also it the good and reliable hosting site; by using this site, you can get cheap and better hosting for your site as well. Minimum withdraw is 15 USD. Accepted Payment method is webmoney.
Tusfiles
Tusfiles is also best and trustworthy site for the earning by uploading, you can earn maxium 10 USD after 1000 uploaded files download, also they give the point on the basis of download. Use it and start making money, also they have user friendly and good staff which gives response quickly. To earn with tusfiles, just signup and start uploading the files and earn the maximum with them.
Withdraw notes : It gives the withdraw within 48 hours when you get the minimum amount of 10 USD. Accepted Payment methods are webmoney, payza, paypal, wire transformer, payoneer, perfect money, and amazon gift card.
Hugefiles
Hugefiles is also a trusted and good service which gives money on uploading the different types of files and gives revenue after downloading these files. It gives maximum of 25 USD after downloading of 10000 files. The minimum withdraw amount for this hosting site is 15 USD. To earn signup link is given below
Withdraw notes : Accepted Payout methods are webmoney and paypal.
Freakshare
It’s also a trusted site which gives more than 25 USD on 1000 downloads of your uploading site w.r.t size of your files.
Withdraw notes : The minimum withdraw is 15 USD and accepted payout method is webmoney.
Sendmyway
It’s also a good and newly designed upload hosting site which gives the maximum of 10 USD after 1000 downloads of your files.
Withdraw notes : The minimum withdraw is 10 USD and accepted payout method is paypal.

NOTE
There are lot of sites for this purpose, but these are the genuine sites which are not fraud or any other spamming sites which have given money a lot of user’s. Also you can ask any question regarding the topic. Guys as I have used referral links, so it’s your choice to whether trust me or not.

How To Setup Custom Domain For Your Blog In Blogger With Godaddy.com

how_to_setup_custom_domain_name_to_your_blog_full_guide
Add Custom Domain Name To Your Blog
Setup Custom Domain For Your Blog - 
In this post I will explain "How to setup custom domain name for your blog". I will provide you very easy guide that will very useful for you and it will be 100% works. I will teach you how to setup custom domain name for your blog on blogger.com in easy way.

For Eg. your blogger domain name is www.xyz.blogspot.com and you have to redirect to www.xyz.com, thats it.


What Is Custom Domain ?

Firstly we must understand what actually custom domain is. Custom domain are likes .com(Commercial) , .org (organisation), .edu (educational) etc. are the types of first level domains.

Eg. www.google.com   (First level domain)
      www.abc.co.in      (Secondary level domain)


What Is The Need Of Custom Domain ?

When you apply custom domain for your blog, then your users  can easily remind domain. Blogger provides you www.xyz.blogspot.com  that will not easy to kept in mind. Then it will reduces our users. The best option for this is Custom domains. And custom domains also improve SEO of your Blog / Site. Now we will see step by step guide to setup custom domain.

Follow The Below Steps Carefully To Setup Custom Domain For Your Blog -


  • You have to buy custom domains from websites like Godaddy, Bigrock etc.
  • Suppose you are buying domain on Godaddy.com
  • Firstly login your www.blogger.com blog
  • Enter username and password.
  • Go in Settings > Basics option. See below screenshot

add_custom_domain_to_blogger_easy_way

  • Now look at the publishing section, your blog name will be appear then click on setup third party url for your blog link. Now enter your custom domain name like www.xyz.com see below screenshot to understand.
how_to_apply_domain_name_to_blogger_blog_easy_way
  •     After entering the url you will get warning we have not able to verify your authority to this domain  
  •     Now you will get Name, Label or Host and Destination, Target or Points To Fields. You can see above in Screen shot. For eg. www is your host and ghs.google.com is yuor points to  field.
  •      Now open another tab in your browser and go to your domain provider website like www.godaddy.com and enter your login details.
  •     Now login into your Godaddy account and click on My Account tab.
use_.com_domain_for_your_blog_with_godaddy_.com

  • Now you have to go on Domain Manager.
add_godaddy_domain_name_to_your_blogger_blog_full_tutorial

  •     In the domain manager page you will see option DNS MANAGER. You have to click on DNS MANAGER.
      
  •  Note that in DNS MANAGER you have to enter A(Host) and Cname.
     
  •   Now click on A(Host) tab you have to enter this 4 ip addresses one by one using add button.
    216.239.32.21
    216.239.34.21
    216.239.36.21
    216.239.38.21
  •     After you done adding records click on save button to save your records.

  • Now you have to enter your Cnames (alias). You Cname alias are www      ghs.google.com see below screenshot. Now you have to enter your Host and Points to Fields that's it. After adding records click on save.

  •  Now open your blooger.com blog and enter url then click on save button.
 You have done, now you have to wait for few hours to take effects in your ip records. Just relax and seat back. After few hours you will see that your blog address is redirects to your new custom domain. :) 

Note -  If you don't write your host www and points to ghs.google.com then if  users not type www in url field, then your site will not appear to them. So follow above steps carefully and setup your custom domain name.
 

It may take upto 72 hours to take effects in your ip records. I will suggest to you buy a domain name on Godaddy.com.

What you think right now it is easy to setup. Show your love in comments. :) And share this page on Facebook and other social sites.

If you liked this post, please share his post with your friends on Facebok and other socials sites because 'Sharing is Caring' :)

If you have any query regarding this post, don't hesitate to ask in comments below.  :) 

Keep visiting for more tutorials. :)

Thursday, 12 February 2015

How To Upload Template On Your Blogger.com Blog 2015

how_to_upload_customized_template_on_blog_latest_full_guide
Easy way to upload or apply custom Template on your Blog-

In previous post I explained 'How To Create Blog On Blogger.com' We have to create a good looking blog but the templates are provided by blogger are not so good. There is another way to change design of your blog by uploading premium or free template. There are many free/premium templates available on the internet. For example Templatism.com provides 2 col, 3 col templates. Choose one template, download it and upload on your blog.

How to upload custom Template on Blog ?


  • Open www.blogger.com and login with your username and password. 
  • Then select your blog on which you want to upload your custom Template
  • Now go to Template [Bottom in left panel] > Backup/Restore [Right Top] as shown in Pic. below
add_customized_tempalte_to_your_blog_easy_way

  • Now a pop-up will open, now browse your Template and then click on Upload as shown in picture below
design_your_blog_with_your_customized_template_full_tutorial

  • After upload click on Close.

That's it. You have done. Now enjoy your new customized template on your blog with new design and user interface. :) 


If you like this post, please share this post with your friends on Facebook, Google+ and other social sites because 'Sharing is Caring' :) 


Keep visiting for more tutorials. ;)

Saturday, 7 February 2015

How To Create A Blog On Blogger.com 2015

how _to_create_blog/site_on_blogger_full_tutorial_2015
Create A Blog On Blogger.com - 

Most of the peoples have dream to create a Website. But due to the money problem they are not able to create. Few websites provides free domain, hosting etc. but don't trust such sites as they can easily leak your data. So today I will show how to create a free blog/website on blogger.com.

What Is Blog ?

Blogger is owned by Google. First look at actually what blog is. Blog is the platform on which you can able to create a free website/blog. On the internet Blogger and Wordpress provides you an easy way to create blog/website. On blog you can write a post about various topics such as blogging, technology related post and share with the users.

How to create blog on blogger.com step-by-step tutorial-

  • First go to  www.blogger.com
  • You need a gmail account to access Blogger.com [Create one if you don't have]
create_free_website/blog_in_a_minute_full_tutorial

  • Then enter your gmail username and password and click on "Sign in" 
  • Now click on Create a new blog and then enter Title of blog you want to create and in next field enter blog address e.g abc.blogspot.com
how_to_make_a_blog_free_full_tutorail_easy_way
  • Check address availability of your blog. If blog address is available then choose Template and then click on Create blog.
  • That's it. Now your blog is created. :)


If this post was helpful then please share this post on Facebook with your friends. 


Keep visiting for more such tutorials and tricks. :)