Showing posts with label Tutorial. Show all posts

Sunday, 5 April 2015

How To Download Full Backup Of Blogger Blog Posts

How_to_download_full_backup_of_blogger_blog_posts
Download Full Backup Of Blogger Blog Posts
Namaste :) In this post I'll explain How you can download full backup of your blogger blog. Nowadays every newbie have their own blog. The main purpose to create a blog on blogger.com is to make money with Google AdSense. Because Google AdSense is best choice to show genuine ads on your blogger and make money with it. Read this post 'Approve AdSense In A Minute On Your Blog' to successfully get approved by Google AdSense in very first attempt. Come on the topic, Backup is very important because sometimes your blogger blog gets deleted.  May be it's because your blog is avoiding TOS of Blogger or may be you deleted it by mistake. So in case you loose your all posts of blogger blog. But if you have backup of your blogger blog then you need not to worry you can easily get your all valuable posts. Just upload that backup and you are done! 

So lets start, follow the below mentioned steps accurately to download full backup of your blogger blog - 


How to download full backup of blogger blog ? 


Step 1. First of all login to your blogger dashboard and choose the blog which you want to take backup of. 

Step 2. Then go to > Settings > Other  Here is an option 'Blog Tools' 

Step 3. Click on 'Export blog' and then a pop-up will open. 
backup_all_posts_of_blogger_blog_in_a_minute
Click on Export blog


Step 4. Now click on 'Download Blog' and backup of your blog will start downloading. 

backup_blogger_blog_full_tutorial_easy_way
Download Blog
  
That's it! Now you have full backup of your blogger blog to use in bad situation. To use that backup you have to upload that backup file to the new blog. To do so follow the below instructions. 

How to upload full backup of your blogger blog to another blog ? 


Step 1. Sign in to your blogger blog and open dashboard of your new blog. 

Step 2. Now go to Settings > Other > Blog Tools 

Step 3. Now here you will see three options Import blog - Export blog - Delete blog. 

Step 4. You have to choose 'Import blog' option and a pop-up box will open. 
how_upload_backup_of_blogger_blgo_to_another_blog
Import Blog


Step 5. Now choose your backup file by clicking on 'Browse' button. 

Step 6. Then click on 'Import Blog' button to start uploading your blog backup.
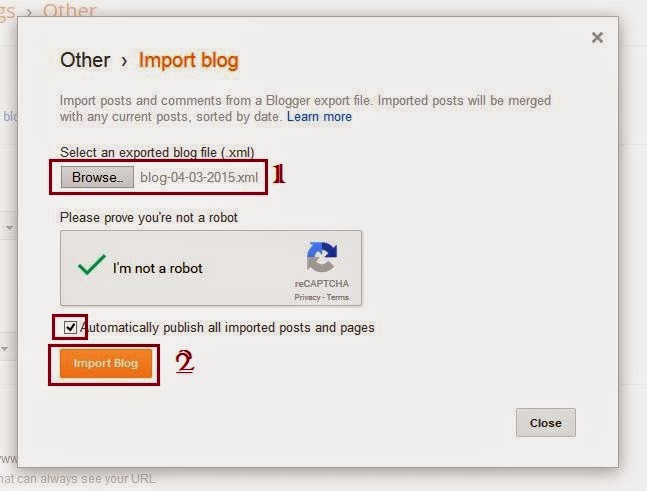
copy_all_posts_of_old_blogger_blog_to_another_blog
Upload Blog


You have done! Now wait a few minutes till backup file successfully uploaded. After that your all posts of old blog will be published automatically on your new blogger blog. :) 

 So enjoy your new blog with all your old posts and pages. :) 

How to backup all posts and pages of Blogger Blog Full Tutorial 


If you liked this post then please share it with your friends on Facebook and other social sites because 'Sharing is Caring' :) 

Keep visiting for more such tutorials and tricks. ;) 

Have any query or questions regarding this post ? Don't hesitate to ask in comments below. 

Share+Like+Comment - Thank You! :)

Saturday, 4 April 2015

Free Calling Android App Without Internet Connection 2015

free-calling-android-app-latest-working
Hullo Free Calling Android App
Namaste! :) In this post I am gonna share an awesome android app to call anywhere, anytime for free without Internet Connection. Yes! you heard right now you can call anywhere without paying a single penny even without internet connection. :) Nowadays everyone wants a solution to reduce calling bills. So after reading this post you won't need to waste your hard earned money on calling bills. This is just a simple app that offers free calls worldwide without internet connection. So by using this android app you can call to anyone without internet for free. 
This app is called Hullo. Hullo is an android app that gives you freedom of calling anywhere, anytime for free.  So lets start without wasting priceless time.

What is Hullo ?

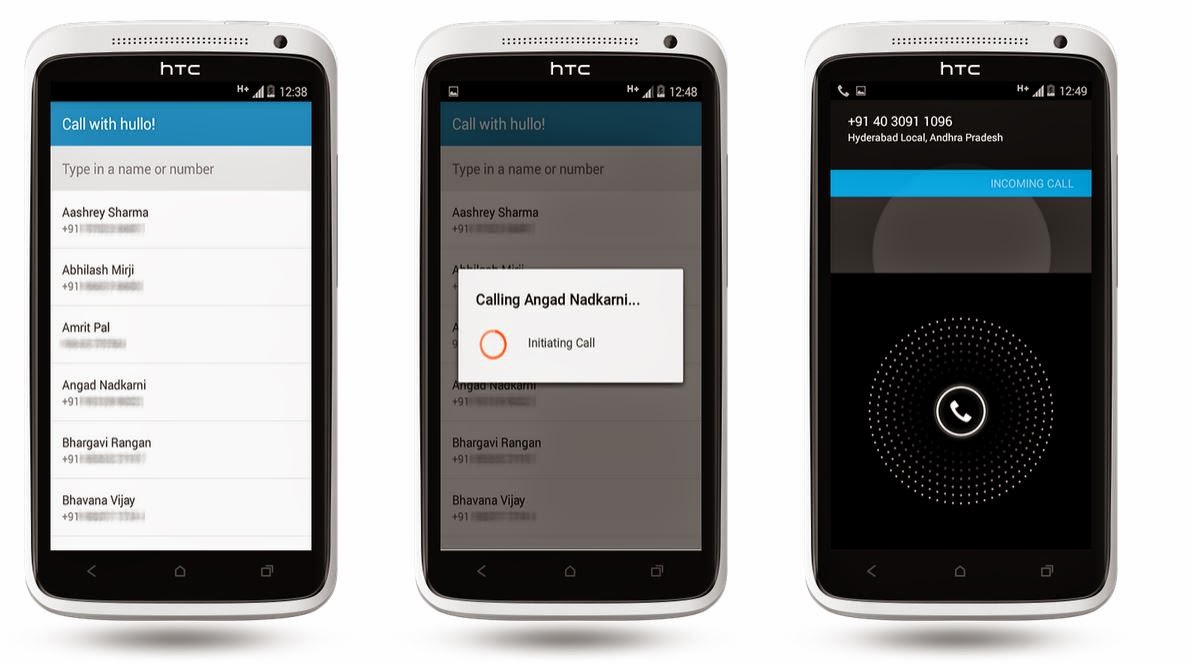
  • Hullo is your awesome new free calling app that doesn't need Internet data. 

free_calling_app_free_unlimited_calls_anytime_without_internet
Free Call Without Internet Data

Features of Hullo Free-Calling App - 


  • Hullo is free android app
  • Easy to use
  • No Internet data required
  • Free calling anywhere, anytime 
  • Small in size


How to use Hullo free-calling Android app ? 

  1. Download Hullo app from given link 
  2. Install Hullo free-calling app
  3. Connect with Facebook 
  4. Tap on a contact to call them for free. :)

Now you need not to worry about phone bills. No more worrying about balance. No more missed calls. No limits on talk time or number of calls made. Use Hullo free-calling app and enjoy unlimited free calls from your android device/smartphone even without wasting your internet data. :)

Download Hullo Free-Calling Android App For Free - 


Hullo Free Calling App


Latest Post - Hack Wi-Fi Password In Android Phone

Frequently asked question about Hullo free-calling app -
 

Q. Do I need internet to make the call?
A. Only to request the call. You do not require your internet data for the call.
 
Q. I just got a message saying you are offline
A. That is because the friend who tried to call you did not have mobile internet switched on while calling you.

Q. Does my friend need internet to recieve a call?
A. No they do not, as the phone calls are not over the internet.

Q. Where do I report issues?
A. You can message us on hullo@gethullo.com or on our facebook page.

Q. Are SMS’s free too?
A. No, only calls are free.

Q. What if I am on windows or iOS?
A. The hullo app for Windows and iOS are to be released shortly.

Q. Is this anywhere in the world?
A. As of now this is just for calls in India.


If you liked this post please share it with your friends on Facebook and other social sites because 'Sharing is Caring' :) 

Keep visiting for more such tricks and tutorials. 

If you have any query or questions regarding this post, don't hesitate to ask in comments below. 

Share+Like+Comments - Thank You!

Saturday, 28 March 2015

Fileice Survey Bypass/Complete In A Minute Latest [Working] 2015

fileice_survey_bypass_complete_in_a_minute_latest_working_2015
Bypass Fileice Survey In A Minute
Namaste :) In this post we are back with a awesome tutorial 'How to complete/bypass Fileice Survey'. Yes! Now you can complete or bypass fileice survey by your own, you don't need any software or bypass tool. As we all know that all the tools and software those offers to get direct link of Fileice files are fake and not working. So today I'll guide you to complete fileice survey to get your desired file instantly. 

There are lot of website which are posting Fileice survey completion guide. But most of them are fake and doesn't providing real and working method to bypass fileice surveys. Don't worry in this post I'll teach you step-by-step 'How you can complete Fileice Survey in a minute'. 

By this trick you can bypass any survey. This method is also works on Cleanfiles, Sharecash etc. So read full post and be prepared to bypass any kind of Survey by itself. After reading this post you won't need to ask or beg anyone to bypass your survey link.


How To Bypass Filiece, Sharecash and Cleanfiles Survey - 


Step 1. First of all you must have a VPN or Good Proxy of US.

Step 2. Now connect VPN with US server and check your ip location from Here!

Step 3. Then open Fileice Link in Internet Explorer or Google Chrome.

Step 4. Now click on 'Regular Download' and select any survey, a new tab will open. 

how_to_complete_fileice_survey


Step 5. Now Click on 'No thanks continue' in top right corner and then answer some useless questions. :P 
fileice_survey_bypass_trick_latest_2015

Step 6. Here fill fake info ex: Fake Name, Fake Email etc. 
bypass_fileice_survey_easily_full_guide


Step 7. Click Continue and then fill fake mobile no. , Age etc. 
fileice_survey_unlock_in_a_minute


Step 8. Now click on Continue. And that's it now your file will start downloading. 
how_to_bypass_fileice_sharecash_cleanfiles_survey_in_a_minute


How To Bypass Filecie Survey In A Minute Full Video Working


Note:- If the file not unlocks after 1st attempt then choose another survey and do the same. You will surely get your file unlocked. :) 


Download Unlimited UDP VPN 


Unlimited UDP VPN Free


If you have any query or questions regarding this post then don't hesitate to ask in comments. We are always happy to help others.


If you liked this post then please share this post with your friends on Facebook and other social sites because 'Sharing is Caring' :)


Share+Like+Comments - Thank You! :)


Friday, 27 March 2015

WIBR Plus Wifi BRuteforce Hack Pro Apk 1.0.3 Full Android 2015

hack_wifi_password_in_android_smartphone
How To Crack Wi-Fi Password In Phone
Namaste :) In this post I will explain how to hack/crack Wi-Fi password in your Android device/smartphone by using Wibr Plus Pro APK. Yes you can crack wifi password in your phone. It's simple and very useful app by which you can easily crack password of any wifi network near you. Wibr Plus is an application specially developed to access Wi-Fi networks which are using WPA/WPA2 PSK encryption. This application is to test the security of your Wi-Fi network. This App isn't fake and it's working perfectly. It is possible to access Wi-Fi network if it uses weak password. 

Also Read - Approve Google AdSense On Your Blog In A Minute

Description of Wibr Plus Pro APK :- 

wibr_plus_apk_hack_wifi_in_phone
how_to_crack_wifi_password_in_smartphone
Wibr+ Wi-Fi Network Security Test


How to Hack/Crack Wi-Fi Password by Wibr+ -


1. First of all list the available wifi networks and select that you want to crack. Wibr+ is tested on WPA/WPA2 with PSK (Pre-Shared Key). Please note that if signal strength is weak result may unreliable.

2. Now select dictionary that you want. There are 3 predefined wordlist which you can use. These dictionaries contains all commonly used passwords.

3. Wait for the results. It may take looooong time due to device strength. Wibr+ is also Battery eater. ;)


Please Note That Hacking Someone Else's Wi-Fi Network Is Illegal! This Tutorial Is Only For Educational Purpose. Use Only To Test Your Own Wi-Fi Network. We Are Not Responsible For Any Illegal Use Of This Tool. Hope You Understood.


Download Wibr Plus Pro APK 

Download Wibr Plus Pro APK Free 

Password - onlyhax


If you liked this post, please share this post with your friends on Facebook and other social sites because 'Sharing is Caring' :)


Also visit - Unlimited Free Mobile Recharge


If you have any questions regarding this post don't hesitate to ask in comments below.

Keep visiting daily to know more such hacks and tutorials. ;)


Share+Like+Comments-Thank You! :)

Saturday, 21 March 2015

Approve Google Adsense In A Minute After Disapproved/Rejected [Full Tutorial] [Latest]

AdSense Disapproved/Rejected Fix
Namaste! :) In this post I am back again with the solution of a very common issue 'AdSense Disapproved/Rejected'. It is as 'Google have any personal problem with me, it always disapproves my application'. ;) But it's not like that, Google AdSense only approve those blogs or website which compile with their terms and conditions. But if your blog or website disapproved for AdSense, then this post is for you and its very helpful. 
As I also faced the same problem and I was tired because every time I apply for AdSense, only one email from Google AdSense 'Unfortunately after reviewing your blog/website we are enable to approve your application at this time' :( Isn't it ridicules ? Yes it is. But after so many attempts I got success, finally Google AdSense Approved on my blog/website.
And now I can show ads on my blog without any further issue. And it's ultimate and very simple trick to get Approved for Google AdSense. You can also find many posts and articles on web about 'How to get fully Approved Google AdSense'. But most of them are useless and some are very difficult. 
But after read this post you won't need to find another solution for this issue, because it's confirmed working and tested by me. And by this method you will definitely get Fully Approved AdSense Account for your blog/website. 
So lets start and follow the below steps accurately, if you want to Approve Google AdSense on your blog/website:

Steps to be followed - 
Step 1. First of all create a YouTube Channel and upload some unique videos. [Don't upload someone's else video]
Step 2. Now after that enable Monetization on your YouTube videos. To do so go to My channel > Videos Manager > Channel > Monetization and enable Monetization.
adsense_approval_trick_confirmed_working_2015
google_adsense_disapproved_fix
Enable Monetization on YouTube Channel
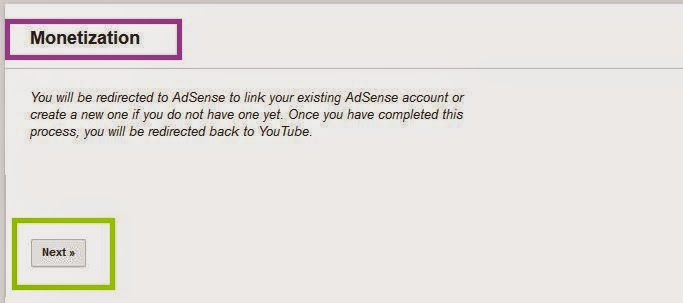
 Step 3. Now YouTube will ask you to associate an AdSense account with your YouTube Channel to get revenue. 
Step 4. Then associate AdSense account by following screen instructions. [Go to > Here! and click Next ]
enable_monetization_on_youtube_channel
Associate AdSense Account With YouTube Channel

Step 5. Now after that you will get an email from Google AdSense that 'Your AdSense account is approved to show ads on your YouTube videos' 

Step 6. Now go to your AdSense account make sure that it's fully activated.

Step 7. Then go to your blog dashboard on which you want to apply AdSense and navigate to Settings > Basic > Permissions > Blog Authors, here click on +Add authors and enter that Gmail id on which you got approved AdSense for YouTube and click Invite.


adsense_approve_on_your_blog/website_within_a_minute
Add New Author


Step 8. Then open your AdSense approved email id and you will find an email of invitation to contribute for blog, open it and accept invitation.

Step 9. Now go to you Blog dashboard > Earnings > Switch account and use your approved email id and click on Continue.


google_adsense_account_approval_trick_working
Switch AdSense Account
Step 10. That's it you will see a message that 'Congratulation! The AdSense widget has been added to your blog template.' Now click on Continue and setup ads on your blog/website. :)


adsense_approved_on_blog/website_in_a_minute
AdSense Approved 
Now you can show ads on your blog/website without any issue. And by using this method you need not to wait a long to get reply from AdSense. So guys I hope you enjoyed this tutorial. :) 
I also created a video of this, by which you can better understand the steps. So watch the full video and enjoy your fully Approved Google AdSense Account :) 

How To Approve Google AdSense On Blog In A Minute [Working]


So if you liked this post, please share this post with your friends on Facebook and other social sites because 'Sharing is Caring' :)


If you have any query or questions regarding this post, then don't hesitate to ask in comments below. We will reply ASAP. :) 


Share+Like+Comments - Thank You! ;)

Thursday, 12 February 2015

How To Upload Template On Your Blogger.com Blog 2015

how_to_upload_customized_template_on_blog_latest_full_guide
Easy way to upload or apply custom Template on your Blog-

In previous post I explained 'How To Create Blog On Blogger.com' We have to create a good looking blog but the templates are provided by blogger are not so good. There is another way to change design of your blog by uploading premium or free template. There are many free/premium templates available on the internet. For example Templatism.com provides 2 col, 3 col templates. Choose one template, download it and upload on your blog.

How to upload custom Template on Blog ?


  • Open www.blogger.com and login with your username and password. 
  • Then select your blog on which you want to upload your custom Template
  • Now go to Template [Bottom in left panel] > Backup/Restore [Right Top] as shown in Pic. below
add_customized_tempalte_to_your_blog_easy_way

  • Now a pop-up will open, now browse your Template and then click on Upload as shown in picture below
design_your_blog_with_your_customized_template_full_tutorial

  • After upload click on Close.

That's it. You have done. Now enjoy your new customized template on your blog with new design and user interface. :) 


If you like this post, please share this post with your friends on Facebook, Google+ and other social sites because 'Sharing is Caring' :) 


Keep visiting for more tutorials. ;)

Saturday, 7 February 2015

How To Create A Blog On Blogger.com 2015

how _to_create_blog/site_on_blogger_full_tutorial_2015
Create A Blog On Blogger.com - 

Most of the peoples have dream to create a Website. But due to the money problem they are not able to create. Few websites provides free domain, hosting etc. but don't trust such sites as they can easily leak your data. So today I will show how to create a free blog/website on blogger.com.

What Is Blog ?

Blogger is owned by Google. First look at actually what blog is. Blog is the platform on which you can able to create a free website/blog. On the internet Blogger and Wordpress provides you an easy way to create blog/website. On blog you can write a post about various topics such as blogging, technology related post and share with the users.

How to create blog on blogger.com step-by-step tutorial-

  • First go to  www.blogger.com
  • You need a gmail account to access Blogger.com [Create one if you don't have]
create_free_website/blog_in_a_minute_full_tutorial

  • Then enter your gmail username and password and click on "Sign in" 
  • Now click on Create a new blog and then enter Title of blog you want to create and in next field enter blog address e.g abc.blogspot.com
how_to_make_a_blog_free_full_tutorail_easy_way
  • Check address availability of your blog. If blog address is available then choose Template and then click on Create blog.
  • That's it. Now your blog is created. :)


If this post was helpful then please share this post on Facebook with your friends. 


Keep visiting for more such tutorials and tricks. :)

Thursday, 5 February 2015

How To Download Apps Form Google Play On Your PC/Laptop

Download Apps From Google Play Store To Your PC- 

Hello guys, today we are with the new topic How To Download Apps Form Google Play On Your Pc. Yes it is possible, we can download .APK fils in our pc/laptop directly from Google Play Store.You can download .apk file in your pc and then paste to your mobile.
This post will be very helpful to you. This trick is very simple and easy to do.


How To Download APK Files -


 1. First search app on google play store
 2. Copy the app link from google play store
 3. Then Go Here!
 4. Paste your link in the text box as shown in pic below


5. Click on generate link. You download will be start.

You have done. Enjoy! :) 


If you like this post, Please share it with your friends on Facebook and other social sites. :)

Keep visiting for more tricks and tuts. ;)

Tuesday, 3 February 2015

How To Use Whatsapp In PC Without Any Software 2015

use_whatsapp_in_pc_without_using_any_third_party_software

Use Whatsapp In Your PC/Laptop Without Any Software- 

 Many users want to access Whatsapp in pc. Some of them don't have smartphone and some likely to run Whatspp in pc. There are many ways by which you can run Whatsapp in your pc/laptop but those methods need an software to be installed in your pc.
Today i will show you how to access Whatsapp on your pc/laptop.
Whatsapp company declared whatsapp for pc/laptop. Jan Coum is the CEO of Whatsapp.


How To Acess Whatsapp On PC -

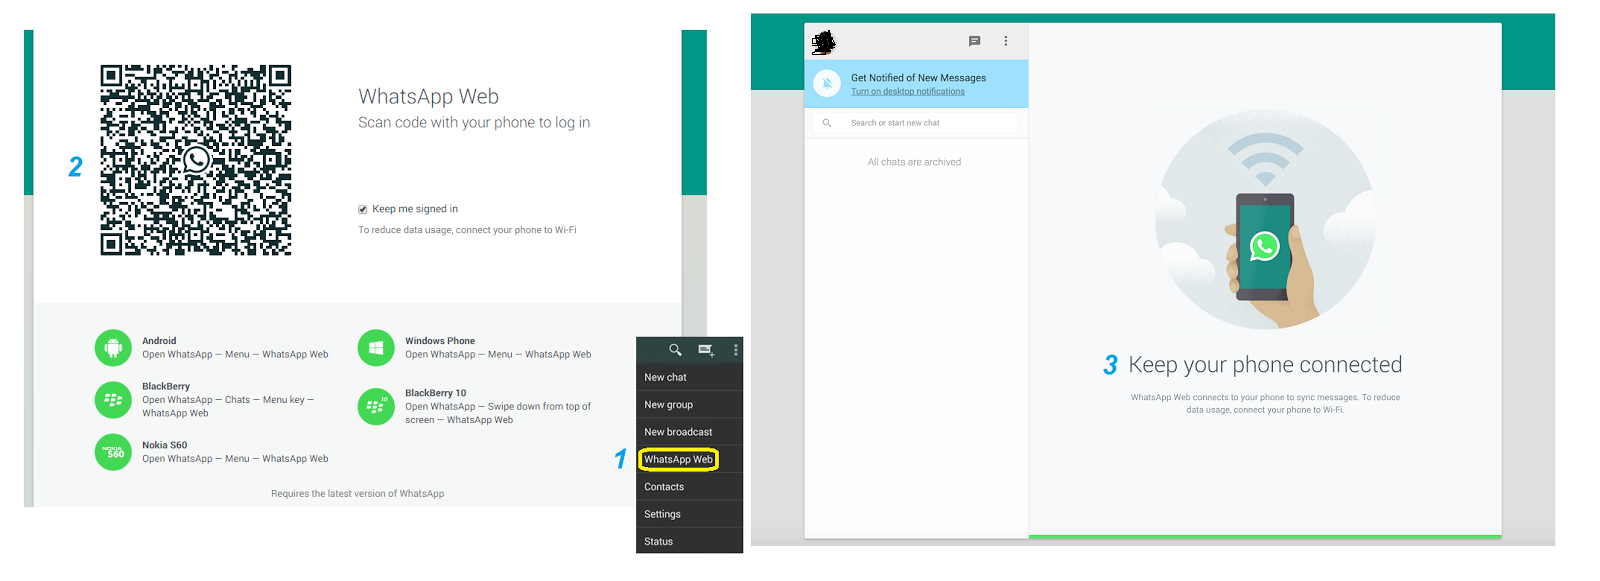
  •     First Open Google Play Store and first update your whatsapp version.
  •     Now navigate to Whatsapp mobile app >> Whatsapp menu and select Whatsapp web.
  •     Now to access Whatsapp for web you need  Google Chrome browser, install it if you don't have in your PC.
  •     Now open Google Chrome browser and go to web.whatsapp.com.
  •      Scan the QR code in your updated Whatsapp version.
trick_to_use_whatsapp_in_pc_latest_easy_way_2015
  •     Wait for few seconds, Whatsapp is gaining access to provide you Whatsapp for web feature.
  •     Now enjoy Whatsapp on PC.


If you like this then please this post with your friends on Facebook and other social sites. 

Keep visiting for more tricks and tutorials.